You can adjust most picture and sound settings while you are watching a program by pressing  (asterisk button) to display the option menu. If you don't find what you need, there are additional picture and sound settings in the settings menu.
In most cases, the setting changes you make apply only to the input you are using, antenna TV, and each separate HDMI input. The AV inputs have their own settings that the TV remembers when you return to those inputs. Additionally, the TV also remembers the settings that you specify while viewing streaming content.
- 1. Use the settings menu to adjust overall TV settings. Press
 (home button) to go to home screen, and then navigate to settings > TV picture settings.Tip: You can adjust the following overall TV picture settings from the settings screen:
-
TV brightness - if the lighting level in your TV room changes, use this setting to help provide a better viewing experience; set it to darker for a darker room, and brighter for a brighter room. Choose among normal and four other settings to make the overall picture brighter or darker. So that you don't have to make this type of change for each TV input one at a time. This setting increases or decreases the TV's general brightness across all TV inputs. Additionally, the setting is identical to the TV brightness setting you can access in the options menu while watching a program.
-
Settings per input - This section of options lists each TV input. Select an input to switch to that input. Then press
 (asterisk button) to display the options menu, where you can adjust the input's settings while watching a live picture and listening to the sound from that input.
Tip: You don't have to go to the settings menu first -- you can display an input's option's menu and adjust its settings whenever you are watching the input by pressing. (asterisk button).
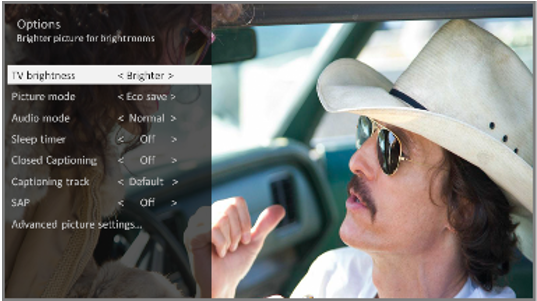
- 2. The options menu for each TV input provides settings for controlling the appearance of the picture and the quality of the audio.
- To view the options menu, press
 (asterisk button) whenever you are watching a TV input or streaming a video. The options menu is a panel that appears over the left side of the screen:
- To adjust the settings on the options menu, press
 (up button) or
  (down button) to highlight a setting, and then press
  (left button) or
  (right button) to change the setting. You'll notice the changes you make right away in picture appearance or audio quality.
Tip: When you highlight a setting, the header text explains the effect of its current value. When you begin to adjust a setting, the other options are hidden so you can see more of the screen. Even though the other settings are hidden, you can move the highlight up or down to adjust the other settings.
-
TV brightness - affects the overall brightness of the picture. This setting applies across the entire TV; that is, to all TV inputs and is identical to the TV brightness setting in the TV picture settings menu.
-
Picture mode - Provides pictures presets for various viewing preferences. This setting applies to the currently-selected input only.
Tip: To dismiss the options menu, just wait a few seconds without pressing any buttons. Or press  (asterisk button) again to dismiss the menu immediately.
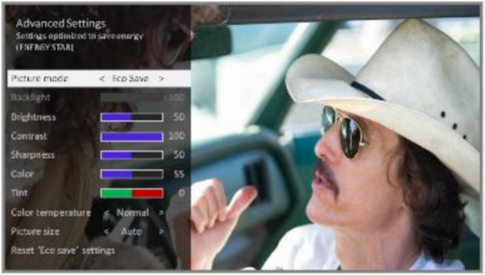
- The advanced picture settings menu for each TV input provides settings for fine tuning the appearance of the picture. All the settings in this menu apply only to the currently-selected input.
- To use the advanced picture settings menu, first press
 (asterisk button) to display the options menu. Then select advanced picture settings.
- To adjust the settings on the advanced picture settings menu, press
 (up button) or
  (down button) to highlight a setting, and then press
  (left button) or
  (right button) to change the setting. You'll notice the changes you make right away in picture appearance.
Tip: When you highlight a setting, the header text explains the effect of its current value. When you begin to adjust a setting, the other options are hidden so you can see more of the screen. Even though the other settings are hidden, you can move the highlight up or down to adjust the other settings. As soon as you press  (up button) or
  (down button), the other settings become visible again.
-
Picture mode - provides picture presets for various viewing preferences. This setting duplicates the one on the options menu. When you change the picture mode, other picture settings adjust accordingly. For example, setting the picture mode to vivid sets brightness contrast, sharpness, and other values to produce a very vibrant picture. Setting picture mode to movie changes these same settings to produce a picture suitable for enjoying movies in a darkened room. If you make changes to the individual picture settings-for example, contrast, or sharpness-these settings are saved for the current input and the current picture mode. In this way, the HDMI 1 input's moviepicture mode can be customized and different than the HDMI 2 input’s movie picture mode and antenna TV’s movie picture mode. Use reset picture settings, described below, to return the input’s current picture mode to its original values.
-
Backlight - adjusts the overall light intensity of the screen.
-
Brightness - adjusts the dark level of the black areas of the picture.
-
Contrast – adjusts the white level of the light areas of the picture.
-
Sharpness – adjusts the sharpness of the edges of objects in the picture.
-
Color – adjusts the intensity of colors in the picture. A setting of 0 removes all color and displays a black and white picture.
-
Tint – adjusts the color balance from green to red to obtain accurate colors in the picture.
-
Color temperature – adjusts the overall colors in the picture from normal to slightly more bluish (cool) to slightly more reddish (warm).
-
Picture size – adjusts the aspect ratio of the picture, enabling you to view a picture in its original format, or zoom or stretch it to fill the screen. The auto setting has been found to produce the best picture in most cases.
-
Game mode – controls whether game mode is on or off. When on, the TV performs less image processing and has less input lag. When Off, the TV may perform more image processing and has more input lag, which is less desirable for action games. Available only for HDMI® and AV inputs.
-
Reset picture settings – returns all picture settings for the input’s currently-selected picture mode to their original values.
Tip: To dismiss the advanced picture settings menu, just wait a few seconds without pressing any buttons. Or press (asterisk button) again to dismiss the menu immediately.